Supplies
- FloraCraft® CraftFōM:
- (1) 12" x 12" x 1" Block - White
- (2) 12" x 12" Paper - Valentine Themed
- Tag Die Cuts
- 2 Sticker Sheets
- Dome Stickers
- Jewels
- 1/4" Pink Brad
- Toothpicks
- 3" Tall Paper Cup
Tools
- Extra Strength Glue Stick
- Foam Mounting Tape
- 12" Rotary Paper Trimmer
- 12" Metal Ruler
- 12" x 12" Cutting Mat
- Retractable #1 Knife
- Foam Cutter
Instructions
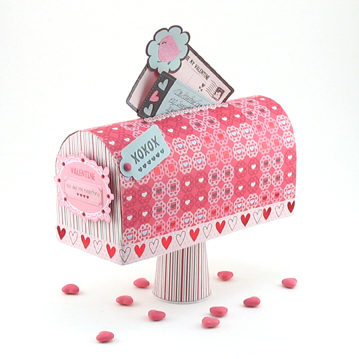
- For a mailbox, use a foam cutter to cut 4″ x 8″ Base. For two ends, trace the pattern onto the foam block and cut it out. On both short edges of Base, insert round toothpicks approximately 1″ into foam, spacing toothpicks 1″ apart from each other. Run the glue stick along the bottom edge of one end and connect to the Base toothpick edge, pushing two pieces together until snug. Repeat to trace, cut, and attach other ends.
- Use a paper trimmer to cut 10″ x 12″ “Framed Hearts” paper. Use ruler, cutting mat, and a retractable knife to cut 1/2″ x 4 1/2″ rectangular center opening in the center of the paper, parallel to 10″ side. Use the pattern to cut two Ends from “Love Stripe” paper.
- Apply glue stick to one End and attach “Love Stripe” paper. Repeat with other End. Apply glue stick to long edges of foam Base and curved edges of Ends. Wrap paper to attach. Let dry.
- Wrap strips of hearts sticker around the bottom edge of the mailbox, piecing as necessary. Attach a strip of circle stickers to long edges of the opening, trimming to length. Attach dome sticker “You Are My Everything” to “Valentine” die-cut and attach to end of the mailbox with a double layer of foam mounting tape (for dimension). For mailbox flag, attach “XOXO” tag with brad, pushing brad ends into foam edge.
- For mailbox post, cover the paper cup with “Love Stripe” paper, trimming to fit and secure with a glue stick. With the cup upside down, glue the cup to the bottom of the mailbox.
- Make “Valentines” (letters) from remaining die cuts. Prop and glue into the opening.



 Subscribe


