Supplies
- FloraCraft® DryFōM®:
- 2 5/8" x 3 1/2" x 7 7/8" Brick
- Raffia Ribbon
- Sphagnum Moss
- 8 1/2" x 9” Old Coffeepot
- (2) 20" Fall Bushes
- Scrapbook Paper with Pumpkin Images
- Chalking Ink - Amaretto (Reddish-Brown)
Tools
- Foam Cutter
- Wire Cutter
- Glue Gun and Glue Sticks
- Foam Mounting Tape
Instructions
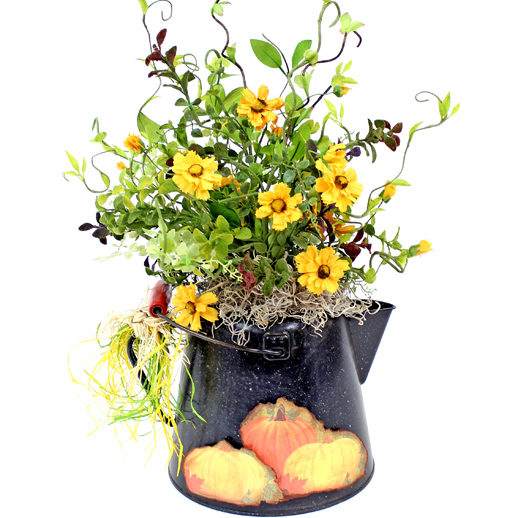
- Use foam cutter to cut FloraCraft® DryFōM® brick in half to make two 4” bricks. Apply hot glue to short ends and insert into the coffeepot.
- Tear out scrapbook pumpkin images by tearing toward you, so that the torn edge shows more. Follow around the edges of pumpkins and leaves for a more natural silhouette. For best results tear a continuous strip rather than small pieces from the paper. “Age” torn edges by rubbing chalking ink downward, along edges. (Note: Practice on torn scrap paper first – can also darken the surface of pumpkins, too, if desired.)
- Referring to the photo, position and use multiple layers of foam mounting tape to attach pumpkins to the side of the coffee pot (so that spout and handle will still show when viewed from the front).
- Insert stems of fall bushes into FloraCraft® DryFōM® brick and bend branches to shape. Curl ends of any stems that extend straight out. Use a wire cutter to trim any ends that are too long. Bend and arrange flowers where desired. (Hint: Snip off flowers and reposition among leaves as needed. Then remove, dab ends with hot glue, and nestles back among leaves.)
- Fill in the top of the coffeepot with Sphagnum Moss to cover the brick. Let moss flow over the side as much as desired.
"*" indicates required fields



 Subscribe


