Supplies
- FloraCraft® CraftFōM®:
- 1” x 12” x 36” Sheet - White
- FloraCraft Smooth Finish®
- 1/2 yds Polka Dot Fabric - Red/White
- Scraps of Coordinating Fabric
- Acrylic Paint:
- Red
- White
- Red Glitter
- Adhesive Chalkboard Sheet (approx. 12”x12”)
- ¼” Ribbon - Metallic Green
- ½” Sheer Ribbon - Red
- ½” Ribbon - Holiday Print
- Toothpicks
Tools
- Foam Cutter or Serrated Knife
- Low-Temp Glue Gun
- Permanent Spray Adhesive
- Scissors
- Spatula or Putty Knife
- Paint Brush
- Fine Sand Paper
- Black Marker
- Poster Board
Instructions
- Use the foam cutter to cut the foam sheet in half. You should have two 12×18″ pieces. Set one piece aside. and Cut 3″ off the 18″ side of the second piece. You should have a 3″ x18″ piece and a 9″ x18″ piece.
- Use the spatula to apply the Smooth Finish® to the top and edges of the 3″ x18″ piece of foam. Apply a smooth, even coat, and fill all the foam cells. Let dry. Lightly sand and apply a second coat if a smoother appearance is desired. Once dry, paint white and let dry.
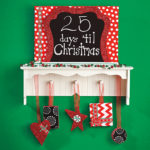
- Print out the frame template, trace it onto the poster board and cut it out. Pin the half-frame template to the edge of the foam’s 9″ x18″ piece. Use the StyroCutter as directed on the package to carefully cut out the frame template from the foam. Remove the template from the foam and flip it over. Pin the template to the foam again. Cut out the second half of the frame. Save the scrap foam to create the ornaments later. Glue the two frame halves together to create the full frame. Paint the front and the sides of the frame red. While the paint is still wet, sprinkle with red glitter. The paint will act as glue and secure the glitter as it dries.
- Cut a 16″ x 22″ piece of fabric. Spray the back of the fabric and the front and edges of the 12″ x18″ sheet with the adhesive. Center the fabric over the foam. Press the fabric onto the foam and smooth out any wrinkles. Fold the fabric neatly at the corners and trim away any excess. Glue the edges of the fabric to the back of the foam sheet. Glue the 18″ edge of this fabric-covered piece to the edge of the 3″ x18″ piece to create the base. This will allow the chalkboard to stand upright (Note: Green and red beads conceal this piece in the photo and are hard to see). Glue the glittered frame centered onto the fabric-covered sheet using the glue gun.
- Cut out a second half frame template from the poster board. Tape the two halves together to create a full frame template. Lay the template onto the back of the chalkboard sheet. Use the marker to trace the inside edge of the template. Cut out the edge of the chalkboard so it will fit in the foam frame. Peel the chalkboard sheet from the backing and spray adhesive onto the back. Spray adhesive onto the fabric on the inside area of the frame. Attach the chalkboard to the fabric smoothing out any bubbles.
- Glue lengths of ribbon around the frame to embellish.
To create the ornaments:
- Cut out basic shapes from the scrap foam by drawing templates with a marker and cutting out with the StyroCutter. We used a rectangle, square, circle, star, and heart.
- Cover the ornaments with scrap fabrics, paint, or glitter. Embellish the ornaments with ribbon—glue loops of sheer ribbon to the backs of the ornaments to hang.



 Subscribe


