Supplies
- FloraCraft® CraftFōM®:
- Cones:
- 9" - White
- (2) 12" - White
- 15" - White
- 18" - White
- 24” - White
- Cones:
- Silk Poinsettia Bush
- Snow Flocked Pine Branches
- Arborvitae Branches
- Pine Cones - Red w/ Snow Tips
- Red Berry Stems
- Natural Branches - Painted White
- 6” Burlap Garland
- Holiday Print Ribbon
- Plaid Print Ribbon
Tools
- Foam Cutter or Serrated Knife
- Low-Temp Glue Gun
- Wire Cutters
- Scissors
Instructions
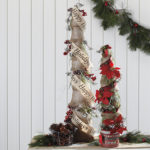
- To create the large tree, use the Foam Cutter or serrated knife to cut off 10.5” from the top of the 24” cone. Save this piece for the top of the tree. Cut 6” off the top of the 18” cone. Cut 6” off the top of the 15” tree. Set aside the two 6” tops for a future project. Using low-temp glue, glue the 18” cone base on top of the 24” cone base. Glue the 15” cone on top of the 18” cone. Glue the reserved 10.5” cone on the top.
- To create the smaller tree, cut 6” off the top of one of the 12” cones. Save this piece for the top of the tree. Cut 4” off the top of the other 12” cone. Cut 3” off the top of the 9” cone. Set aside the 4” and 3” tops for a future project. Glue the taller 12” cone base on top of the shorter 12” cone base. Glue the 9” cone base on top of the 12” cone base. Glue the reserved 6” cone to the top of the tree.
- Cut a length of burlap garland to about 22” long. Wrap it around the bottom of the large cone. Allow the bottom edge of the burlap to hang loose and flare out. Glue the very top edge tight to the cone. Trim off the excess burlap at the top with scissors. Cut another 18” length of burlap. Wrap around the cone just above the first piece with the bottom edge slightly overlapping the first. Glue the top edge tight to the cone, letting the bottom edge hang loose. Continue cutting lengths of burlap and gluing them around the tree, slightly overlapping each piece. Be sure to cut the burlap lengths long enough so that the bottom edges are allowed to flare out from the cone. Continue to cover the entire tree. Repeat this process to cover the smaller tree.
- Glue one end of the holiday ribbon to the top of the large tree. Wrap the ribbon around the cone, spiraling down to the bottom, and glue again. Leave about 4-6” spaces between wraps. Repeat using the plaid ribbon on the small tree.
- Cut apart the flocked pine and the green arborvitae branches using the wire cutters. Push small sprigs of the branches into the large and small trees, evenly spaced, where the upper cone hangs over the cone below. Cut longer sprigs for the bottom section of the tree and shorter sprigs towards the top.
- Cut apart the natural white branches and glue sprigs evenly spaced within the pine branches.
- Glue bunches of berries and red pinecones into the pine branches on the large tree.
- Glue poinsettia blossoms into the pine branches of the small tree.
"*" indicates required fields











 Subscribe


