Supplies
- FloraCraft® CraftFōM®:
- Balls:
- 3” - White
- 4” - White
- 5” - White
- Balls:
- Sixlets® Chocolates
- Rolo® Chocolates
- Ferrero Rocher® Chocolates
- Acrylic Paint:
- Bright Pink
- Gold
- Toothpicks
- Decorative Container (Optional)
Tools
- Low-Temp Glue Gun
- Paint Brush
- Newspaper or Drop Cloth
- Serrated Knife
Instructions
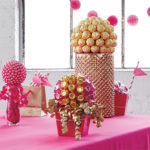
- Cut a small amount off one side of the 5” ball. This will make a flat spot for the ball to sit while you are working. Paint the 5” ball gold and let dry. Paint the 4” and 3” balls pink and let dry.
- Be sure to use a low-temp glue gun as high-temp glue may melt candies. Glue the Sixlets® to the 3” ball side by side to completely cover the ball. Fit them together as close as possible for a uniform look.
- Glue the Rolo® chocolates into the 4” ball. Make sure that the foil covers the entire bottom of the chocolate. Adjust the wrapper as needed. Glue the Rolos onto the ball as the whole side by side. Tip: Place a small dot of glue onto the pink ball and let it cool for a couple of seconds. Then attach the Rolo®. Allowing the glue to cool slightly will prevent the chocolate’s melting through the foil. The Rolo® chocolates can be pulled from the ball and eaten if desired.
- Attach the Ferrero Rocher chocolates to the 5” ball with toothpicks. Push the toothpick part way into the bottom of the chocolate and then push it into the ball. Start at the top of the ball and work your way around to the bottom. Place the chocolates tightly side by side to cover the ball. The chocolates can be pulled from the ball and eaten if desired.
- Optional: Place the candy décor on appropriately sized decorative containers for display.


 Subscribe


