Supplies
- FloraCraft® CraftFōM®:
- Balls:
- 4" - White
- 6" - White
- Balls:
- 2.5" Wired Burlap Ribbon
- 3.75" Burlap Ribbon
- 1 yd. Ribbon - Green
- (2) 5" Natural Twig
- 24" Jute Twine - Natural
- 2" Square Cardstock Paper - Orange
- (2) 3/8" Upholstery Tacks - Antique Gold
- (2) 1" Wood Buttons - Natural with Designs
- 1 3/4" Nest with Birds and Eggs
Tools
- Glue Gun and Glue Sticks
- Spoon
- Floral Shears
- Foam Cutter
Instructions
- Use Foam Cutter to trim 2″ diameter circle off top and bottom of 6″ Ball and just off bottom of 4″ Ball. Use a spoon to scoop out approx. 1/2″ deep from each circled area. (This will give overlapped burlap ends a place to go and a flatter surface for the base and gluing Balls together.)
- From Cream Burlap Ribbon, use Floral Shears to cut eight 10″ lengths for the body and six 7″ lengths for the head. For head, wrap one 7″ length around the side of a 4″ Ball, hot gluing at the top center and bottom center (inside recessed area). Similarly, glue the second length, slightly overlapping the first length in the middle and more at the center top and bottom. Repeat with the remaining four lengths, going all around Ball.
- Similarly, wrap a 6″ Ball body using eight 10″ lengths. Then, stack and glue together two balls (keeping the rounded part of the head on top and planning the best sides for the fronts.)
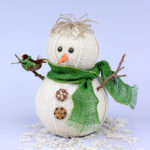
- For Snowman’s scarf, use Floral Shears to cut 21″ length Green Burlap Ribbon. Wrap around the neck and cross over on Snowman’s left side. (No knot is needed.) Fray and scrunch end.
- Glue buttons on the front. For eyes, refer to the photo for the position, halfway down on the head, and press upholstery nails into the head. For carrot nose, carefully scrunch to soften, without tearing, orange paper. Un-scrunch and roll into a cone with one end tapered to a point. Hot glue base of the cone to head, just below eyes. Press on point to slightly bend the carrot.
- For hair, cut six 4″ lengths of jute. Glue center of each length to top center of head so that strands radiate in all directions. Then separate strands in each length for more fullness. (Note: Allow ends to be a bit wild!)
- Plan where to insert twig arms. At those points, use Floral Shears to make a 1/2″ long snip in burlap gently. Insert twigs through Burlap into Foam at an upward angle. Hot glue nest with the bird to the end of Snowman’s right arm. Optional: Cut 1/2″ x 10″ length Green Burlap Ribbon (minus the wire) and wrap around the neck of bird for mini-scarf. Spot glue as needed to hold.
- For “snow,” use Floral Shears to cut off wire from 10″ length Cream Burlap Ribbon. Then snip into approx. ¾” squares, allowing pieces to fray and unravel as much as you’d like. Sprinkle “snow” at the base of Snowman.
"*" indicates required fields



 Subscribe


