Supplies
- Burlap Garland
- Acrylic Paint - White
- Ribbon:
- 5/8" - Green
- 1” - Red
- Satin Ribbon - Red
Tools
- Low-Temp Glue Gun
- Scissors
- Small Paint Roller
- Plastic Drop Cloth
Instructions
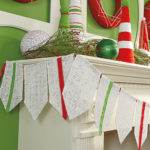
- Cut 10” lengths of the burlap garland to create the sections of the banner. Cut and lay out enough pieces to reach your desired length. Cut one end of all burlap sections into a “V” shape as shown. Don’t worry about the burlap unraveling, as you will trim again after you paint to get a nice straight edge.
- Lay out the drop cloth to protect your work surface. Paint each burlap section white using acrylic paint and the roller. Don’t apply the paint too heavy, or you will fill in the holes of the burlap and make the banner look blotchy. Apply a thin, even coat of paint and let dry. Then apply a second coat for complete even coverage and let dry.
- Cut a length of red satin ribbon, long enough to drape across your decorating space. Fold back the top edge of each burlap section and glue it to the ribbon, spaced about ½” apart. Trim the pointed ends of the banner sections for a uniform look.
- Cut lengths of red and green ribbons and glue them to every other banner section to embellish.



 Subscribe


