Supplies
- FloraCraft® CraftFōM®:
- (3) 5" Cubes - White
- 1”x12”x18” Sheet - White
- Wired Burlap Ribbon - Orange and Black Chevron
- Burlap Garland - Natural
Tools
- Foam Cutter
- Low-Temp Glue Gun
- Scissors
- Floral Pins
- Toothpicks
- Straight Pins
Instructions
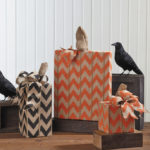
- Glue two of the cubes together, one on top of the other, to create the taller cube pumpkin. Use the foam cutter to cut 4″ off the 12″ end of the foam sheet to create a flat, square pumpkin shape. Set aside the 4″ x12″ piece to attach to the stand later.
- Cut lengths of burlap ribbon long enough to reach from the top center of the cube pumpkins to just under the bottom edges. Line each length of ribbon up to the next one so that the chevron pattern flows around the pumpkin. Glue the ribbon in place on the cubes. Cover the flat pumpkin similarly—glue lengths of ribbon to cover the top, front, and sides of the flat pumpkin.
- Glue the 4″ x12″ piece of foam to the back of the flat pumpkin for the stand. Glue the 12″ edge along the bottom edge to create an “L” shape allowing the pumpkin to stand on its own.
- To create the cube pumpkins’ stems, roll up burlap garland lengths to your desired thickness. Glue the ends of the rolled-up burlap to secure it in place. Glue a toothpick into the top of the pumpkin and glue the burlap stems on the toothpicks.
- To create the stem for the flat pumpkin, create a twisted loop with the natural burlap and glue in place.
- Make bows secure with pins to the tops of the cube pumpkins. Cut two short lengths of chevron ribbon to use as leaves for the flat pumpkin. Glue the leaves in place next to the stem.



 Subscribe


