Supplies
- FloraCraft® CraftFōM®:
- FloraCraft® Diorama Kit
- 1 yd Raffia - Green
- Acrylic Paint:
- Green
- Blue
- (20) Toothpicks
- Sheet Moss - Green
- (8-12) 1" - 3" Plastic Bugs
- (20) 1" - 2" Flowers with Stem Stickers
- (3) 1" Stones
- (2) 3/8" Thumbtacks - White
- 8.5" x 11" Paper - Yellow
Tools
- Glue Gun and Glue Sticks
- Water Container
- Paper Towels
- Paint Brush
- Ruler
- Paperclip
- Old Newspaper
- Scissors
- Tacky Glue
- 24" Thin Fishing Line
Instructions
- For outside of Diorama, on newspaper-covered work surface, paint one side and all edges of Diorama sheets spring green. Let dry. For inside of Diorama, turn over pieces and paint sky blue. Let dry.
- Refer to package instructions to assemble Diorama using tacky glue and toothpicks.
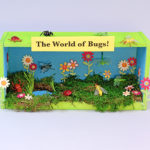
- To create grassy mounds, position one stone about 1/2″ from back left corner, another one 1″ from back left corner and one to right of front center of Diorama. Ask an adult to use glue gun on stones and set back in place. Carefully tear large pieces of sheet moss to cover stones and most of bottom of Diorama, letting moss drape over front edge in a couple places. Leave approximately 3 1/2″ diameter oval to left of center, uncovered for the “pond”. Ask an adult to use glue gun to spot glue moss in a few places.
- To make tall grass groupings for pond, cut four 3″ lengths raffia, align and ask an adult to hot glue together bottom ends. Carefully, vertically tear top raffia ends to shred. Diagonally trim ends to various lengths to simulate growing pond grass. Fold 1/2″ of glued end over and ask an adult to hot glue to edge of pond. Repeat to make two more grass groupings and glue to edge of pond.
- Attach ten flower stickers at various heights to inside sides and back “sky” of Diorama, trimming stems if needed to vary heights. (Note: You can also cut off stems on flowers to be placed directly on moss, and use those stems to lengthen others on back “sky”. Also attach flower to each front side edge. Trim off stems from remaining eight flowers and scatter flowers and a few bugs over moss. Ask an adult to use glue gun to spot glue as needed.
- Choose two flying insects from assortment pack. Cut two 12” lengths fishing line. Tie one length around center of bug body and ask an adult to hot glue to hold. Repeat with other bug. Decide where to hang bugs and mark with pencil. Carefully straighten one end of paper clip to use as a tool to gently twist hole up through top of Diorama at pencil mark. Thread end of fishing line up through hole. Decide height of hanging bug and wrap fishing line around thumbtack. Ask an adult to hot glue tack into hole, making sure to glue fishing line to hold. Trim excess line. Repeat to hang other bug. (Optional: Paint thumbtacks green.)
- Scatter four bugs on top of Diorama, two of which may be covering thumbtacks and ask an adult to hot glue.
- Use computer and printer to print title on yellow paper (or hand write.) Use scissors to trim title to 1 1/2″ wide by as long as title is. Use a few dots of tacky glue to attach title to top front edge of Diorama.



 Subscribe


