Supplies
- FloraCraft® CraftFōM®:
- (3) ½” x 12” x 24” Sheets - White
- Acrylic Paints:
- Blue
- Black
- Red
- Dimensional Fabric Paint (Optional)
- Toothpicks
- Large Balloons
- Straws:
- Large
- Medium
- Small
- (2) Flexible Straws
- (2) Plastic Washers (To fit the large straw.)
- (2) Plastic Washers (To fit the medium straw.)
- (2) Plastic Washers (To fit the small straw.)
- (2) Old CD’s
- (2) Plastic Bottle Caps
- Thin Wood Dowel
Tools
- Foam Cutter or Serrated Knife
- Low-Temp Glue Gun
- Paint Brushes:
- Wide Flat Brush
- Detailing Brush
- Paper (For Templates)
- Black Marker
- ½” Sequin Pins
- Hammer and Small Nail
- Nail File
Instructions
- Print the templates and enlarge to size needed. Hint:
- Cut out the paper templates and pin them to the foam sheets. Trace with black marker; two bodies (glue together for double thickness), two front bumpers (glue together), one back spoiler, two spoiler supports and two spoiler fins.
- Cut out the parts with the foam cutter. Glue the two bodies and two bumpers together and then use the scrap pieces of foam as a sanding block to “sand” parts smooth. Glue the front bumper in place using toothpicks for added support.
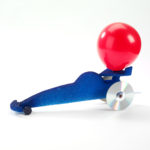
- Assembling the spoiler: Glue the two spoiler fins to the outside corners of the spoiler and glue the two bottom supports about ½” apart, centered and about ¼” in from the back edge. Glue the bottom supports to the back end of the car with the front tip of the spoiler glued to the back of the car top as shown. Use toothpicks for added support. Use a pencil to pilot a hole for the 2 flexible straws to be inserted (the straws should fit snug). The hole should go through the top of the spoiler in between the supports at an angle out the back. The spoiler serves two purposes; it looks cool and it prevents the balloon from touching the wheels and slowing the car. Paint the car and let dry.
- Assembling the back wheels; Use a pencil to pilot a hole (big enough for the large straw), about 1 ¼” in from the back of the car and ¾” up from the bottom. Be sure the hole is level from side to side to keep the wheels level. Glue the two large straw sized washers over the hole on each side. Cut the large straw to about 4 ½”. Center it through the hole and glue in place. Glue the two, medium straw sized washers into the center of the two CD wheels. Cut the medium straw to about 4 ¾”. Glue one end of the medium sized straw into the washer in the CD, thread the other end through the large straw and glue the other wheel in place on the opposite end of the straw.
- Assemble the front wheels: Cut the small straw to about 3”. Glue it centered and level to the bottom of the car, about 2 ½” back from the front bumper. Glue two of the small straw washers tight to the car on either side of the straw to help secure in place. Place the plastic bottle cap onto a scrap piece of wood and use the hammer and nail to pilot a hole through the center of the bottle cap. Use a nail file to smooth the rough edges. Cut a wood skewer to 3 ½” and insert into the straw. Glue a bottle cap on each end.
- Tape the two flexible straws together side by side. Thread the straws into the hole and glue in place with the flexible end pointing straight out from the back of the car and the straight end sticking up through the hole about 1½”. Blow up the balloon and pinch the end. Tape the balloon to the straight end of the straws and let go.
- Cut out two cars and have a race!
"*" indicates required fields



 Subscribe


